
Mechanic SIV-119 And SIV-120 Multimeter Full Review – Best Tool for Mobile Repairing?
If you are a mobile technician or electronics repair professional, having a reliable multimeter is very important. The Mechanic SIV-119 And SIV-120 Multimeter is one of the most popular tools used in mobile repairing for accurate measurement and quick fault detection.
In this review, we will cover its features, specifications, performance, pros & cons, and whether it is worth buying or not.
📱 Key Specifications
Mechanic SIV-119 And SIV-120 Multimeter is a useful digital multimeter for mobile phone technicians and electronics repair professionals. Having a reliable multimeter is important for accurate measurement and quick fault detection.
It also features a continuity buzzer, which helps in checking circuit paths quickly, and a diode testing function for component-level diagnostics. The build quality is strong and suitable for daily workshop use. Its lightweight and portable design makes it easy to carry and use anywhere.
⚙️ Features of Mechanic SIV-119 And SIV-120
- Digital LCD display
- AC/DC voltage measurement
- Resistance (Ohm) testing
- Continuity buzzer (beep test)
- Diode testing support
- Compact and lightweight design
- Easy to use for beginners
- Durable body for long-term use
🛠 Performance & Usage
In real-world usage, the SIV-119 And SIV-120 Multimeter performs well for mobile repairing tasks. It is especially useful for:
- Checking battery voltage
- Testing charging lines
- Finding short circuits
- Measuring resistance on motherboard
- Checking diodes and components
The response time is quick, and readings are stable. For normal repair work, it provides enough accuracy without requiring expensive professional equipment.
Who Should Use the Mechanic SIV-119 And SIV-120 Multimeter?
The Mechanic SIV-119 And SIV-120 Multimeter can be useful for mobile phone technicians, electronics repair workers and beginners who are learning motherboard-level troubleshooting. A multimeter is one of the basic tools required for checking voltage, resistance, continuity and diode readings during repair work.
For mobile motherboard troubleshooting, technicians can use a multimeter to check power rails, charging circuits, component resistance and possible short conditions. It can also help when comparing readings between a faulty board and a known-good board.
However, a multimeter reading should always be interpreted according to the circuit being tested. A resistance or diode reading on a motherboard does not automatically mean that a component is defective. The surrounding circuit and schematic should also be considered.
Pros and Cons
Pros
- Easy to use for everyday mobile repair work
- Useful for voltage and resistance measurements
- Continuity testing makes line checking faster
- Diode mode is useful for motherboard diagnostics
- Compact design for workshop use
- Suitable for beginners and experienced technicians
Cons
- It should not replace specialized laboratory equipment for precision measurements
- Component readings can vary depending on the circuit and board condition
- Users should select the correct measurement mode before testing
HERE WE SHOW YOU SOME PRECTICAL FUNCTIONS-
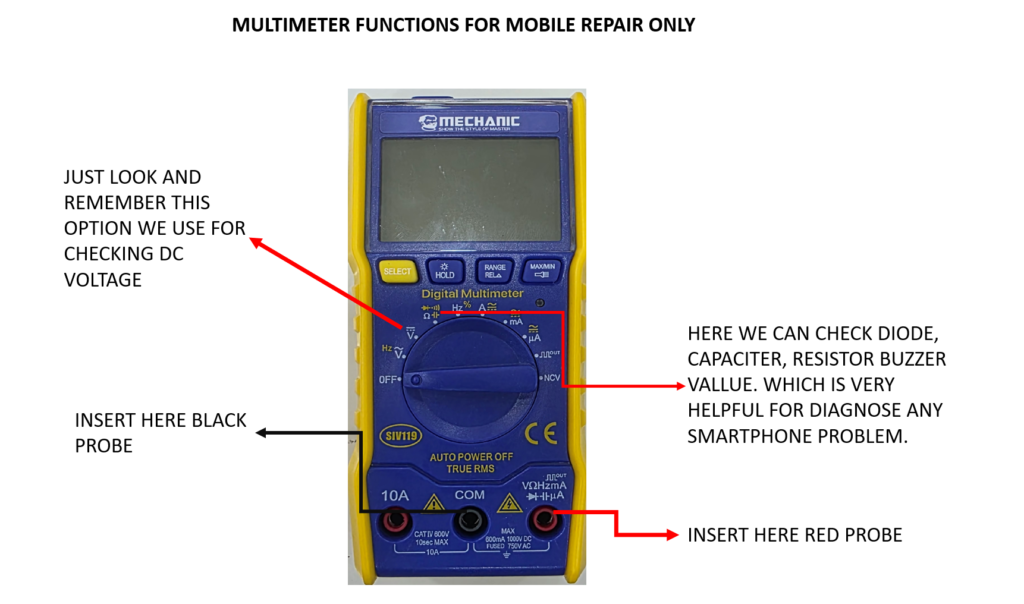
HOW TO CHECK VOLTAGE:
- TURN ON MULTIMETER
- GOTO V ICON SAME AS ABOVE PICTURE
- MULTIMETER DISPLAY SHOULD BE SHOW “DC”
- TOUCH BLACK PROBE IN GND AND RED PROBE INTO POSITIVE LINE IT SHOW THEIR VOLTAGE ON SCREEN
HOW TO CHECK DIODE:
DIODE HAS TWO TERMINALS ONE IS ANODE AND SECOND IS CATHODE.
- TOUCH BLACK PROBE INTO ANODE AND RED PROBE INTO THE CATHODE ITS SHOW 0.200 TO 0.800 READING ON MULTIMETER DISPLAY.
- NOW AGAIN HAVE TO TOUCH BLACK PROBE INTO THE CATHODE AND RED PROBE INTO THE ANODE NOW ITS MUST SHOW OL OR ABOVE 1.000 VALUE THAT’S MEANS DIODE IS GOOD. IF NOT THAT MEAN DIODE IS FAULTY.
HOW CHECK CAPACITOR:
- SET MULTIMETER ON FARAD MODE
- GO TO
 THIS SYMBOL THEN PRESS YELLOW “SELECT” BUTTON UNTIL MULTIMETER DISPLAY SHOWS nF
 - NOW YOU CAPACITOR HAVE TWO TERMINAL CONNECT ANY TWO PROBE OF MULTIMETER IN ANY BOTH SIDE OF CAPACITOR AND HOLD TOUCH FOR 3 TO 5 SEC. NOW ITS SHOW VALUE LIKE 2.200uF MEANS 2.2 MICRO FARAD, IF SHOWS 10.00nF MEANS THE VALUE IS 10 NANO FARAD, IF SHOWS 20.00pF MEANS 20 PICO FARAD.
HOW TO CHECK RESISTOR:
- GOTO OEMEGA SYMBOL
 NOW YOU SHOULD SHOW K SYMBOL ON MULTIMETER DISPLAY
 - TOUCH MULTIMETER BOTH PROBE ANY BOTH SIDE OF RESISTOR’S TERMINAL.
- NOW MULTIMETER DISPLAY SHOULD SHOW 2.200 MEANS RESISTOR VALUE IS 2.2 OHM, IF SHOWS 1.000K MEAN VALUE IS 1 KILO OHMS, IF SHOWS 100.0M MEANS 100 MEGA OHMS.
Ok